


For years, one of the friendlier ways to learn the 3ds Max API in Python was the Explode Geometry sample. It took a selected object, shattered it into one new object per face, and let you optionally shell, collapse, re-pivot, or delete the result. It was a great teaching example because it touched almost everything a real tool needs: a Qt dialog, selection handling, mesh/poly traversal, modifier stacks, and node management.
There was just one problem. The Python version was built on MaxPlus, and MaxPlus is gone (deprecated and removed from 3ds Max 2022).
This post walks through how we brought the sample back, what changed when we moved it onto the modern pymxs + PySide6 stack, and a few things we improved along the way.
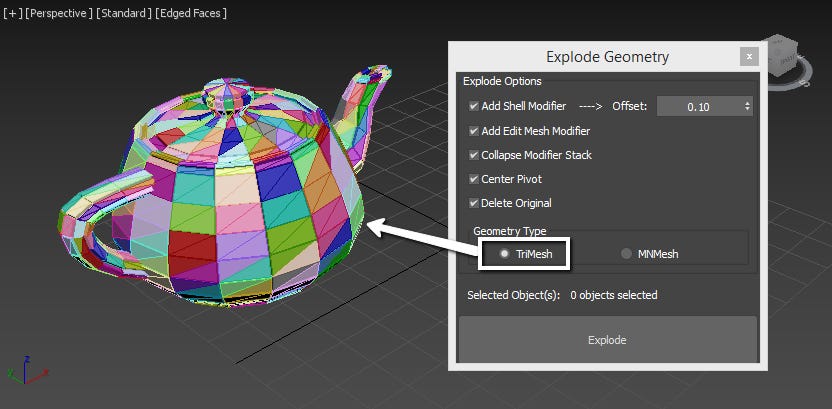
The Explode Geometry dialog (screenshots will be refreshed for the new PySide6 UI).
Also published here: https://blog.autodesk.io/porting-explode-geometry-to-python-life-after-maxplus/
A quick history lesson
MaxPlus was the first official Python binding for 3ds Max, introduced back in 2014. It exposed a hand-curated, object-oriented wrapper over the C++ SDK, classes like MaxPlus.TriObject, MaxPlus.Factory, and MaxPlus.NotificationManager.
It was useful, but it was also a maintenance burden: every class and method had to be wrapped by hand, so coverage was always partial and always lagging the SDK. Meanwhile, pymxs, which exposes the full MAXScript runtime to Python, kept growing into the more complete, better-supported option.
So MaxPlus was deprecated in 3ds Max 2021 and removed entirely starting with 3ds Max 2022. Any sample that imports MaxPlus stops loading; thus the classic Explode Geometry sample sat abandoned because the port wasn’t trivial: MaxPlus and pymxs think about the scene very differently.
The original sample is still in the repo as explode_geometry_classic.py for historical reference. It’s a good before/after companion to everything below, but note it only runs on 3ds Max 2016–2021.
The goals of the port
We set out to do more than merely make it run again:
Drop every MaxPlus dependency and target 3ds Max 2022+ (best on 2026/2027).
Move the UI to PySide6, the Qt6 binding shipped with modern 3ds Max.
Keep feature parity with the .NET sample’s options — shell, edit-mesh, collapse, centre-pivot, delete-original, and the TriMesh/MNMesh choice.
Improve the experience while we were in there: a real progress bar, an undoable operation, a debug toggle, and timing feedback.
Wiring the window into 3ds Max
MaxPlus had its own helpers for parenting a Qt widget to the Max main window and making it dockable:
# Classic (MaxPlus)
form.setParent(MaxPlus.GetQMaxWindow())
MaxPlus.MakeQWidgetDockable(form, 4)
The modern equivalent uses the qtmax module that ships with 3ds Max, plus a standard Qt window flag:
# New (qtmax + PySide6)
form.setParent(qtmax.GetQMaxMainWindow())
form.setWindowFlags(QtCore.Qt.WindowType.Tool)
form.show()
qtmax.GetQMaxMainWindow() returns the real QMainWindow for Max, so the dialog behaves like a native tool window — it stays on top of Max and follows it as expected.
Listening for selection changes
The classic sample registered a selection callback through MaxPlus’ notification manager and tore it down by index:
# Classic
MaxPlus.NotificationManager.Register(
 MaxPlus.NotificationCodes.SelectionsetChanged, self.updateSelectionLabel)
...
MaxPlus.NotificationManager.Unregister(MaxPlus.NotificationManager.Handlers[-1])
With pymxs, we go straight to the MAXScript callback system, which is both more capable and easier to clean up because we can tag callbacks with a named ID:
# New
rt.callbacks.addScript(rt.Name(’selectionSetChanged’),
 self.updateSelectionLabel,
 id=rt.Name(’explodeGeom’))
...
rt.callbacks.removeScripts(id=rt.Name(’explodeGeom’))
Naming the callback group allows us to remove everything under explodeGeom when the Qt dialog closes.
The TriMesh path: from low-level mesh to one call
The classic sample built each face by hand against the low-level mesh API, casting to a TriObject, grabbing the Mesh, setting vertex and face counts, copying verts, and invalidating the geometry cache:
# Classic — manual mesh construction
new_face = MaxPlus.Factory.CreateNewTriObject()
n = MaxPlus.Factory.CreateNode(new_face)
mesh = new_face.GetMesh()
mesh.SetNumFaces(1)
mesh.SetNumVerts(3)
mesh.GetFace(0).SetVerts(0, 1, 2)
mesh.GetFace(0).SetEdgeVisFlags(1, 1, 1)
mesh.GetFace(0).SetSmGroup(2)
for i in range(0, 3):
 pt = tri_mesh.GetVertex(face.GetVert(i))
 mesh.SetVert(i, pt)
mesh.InvalidateGeomCache()
With pymxs we lean on the MAXScript mesh() constructor, which takes vertices and faces directly. The whole per-face body is collapsed to a few lines:
# New — high-level mesh constructor
rt.convertToMesh(node)
num_faces = rt.getNumFaces(node)
for face_idx in range(1, num_faces + 1):
 face = rt.getFace(node, face_idx)
 v1 = rt.getVert(node, int(face.x))
 v2 = rt.getVert(node, int(face.y))
 v3 = rt.getVert(node, int(face.z))

 new_node = rt.mesh(vertices=rt.Array(v1, v2, v3),
 faces=rt.Array(rt.Point3(1, 2, 3)))
 rt.update(new_node)
 new_node.wireColor = _random_wire_color()
 applySettings(new_node, addShell, shell_amount,
 addEditMesh, collapseNode, centerPivot)
No manual cache invalidation, and the new node lands in the scene automatically. As a small visual nicety, we also assign each exploded face a random wire colour so you can actually see the individual pieces.
The MNMesh path: detach instead of rebuild
The classic MNMesh path was the most painful code in the old sample. To make each polygon, it created a PolyObject, reached into the MNMesh, set vertex/edge/face counts, positioned every vertex, built a visibility list, called MakePoly, then FillInMesh, roughly 20 lines of low-level construction per face.
The pymxs version sidesteps all of it. Instead of rebuilding each face as a new poly, we let polyop.detachFaces do the work and hand us back a node directly:
# New — let polyop detach each face into its own node
rt.convertToPoly(node)
num_faces = rt.polyop.getNumFaces(node)
for face_idx in range(num_faces, 0, -1):
 rt.polyop.detachFaces(node, rt.Array(face_idx), asNode=True)
 new_node = rt.objects[-1]
 new_node.wireColor = _random_wire_color()
 applySettings(new_node, addShell, shell_amount,
 addEditMesh, collapseNode, centerPivot)
A couple of details worth noting:
We iterate backwards (num_faces … 1). Detaching a face renumbers the remaining faces, so walking from the end keeps the indices we haven’t processed yet stable.
asNode=True makes detachFaces create a brand-new node for the detached face, which we then grab as rt.objects[-1].
This is dramatically simpler, and it leans on Max’s own, well-tested geometry code instead of our hand-rolled mesh building.
MNMesh mode: each polygon is detached into its own node.
Applying the modifiers
The applySettings helper is conceptually identical between versions — the difference is just how you instantiate a modifier. MaxPlus used the factory and a parameter block:
# Classic
mod = MaxPlus.Factory.CreateObjectModifier(MaxPlus.ClassIds.Shell)
mod.ParameterBlock.outerAmount.Value = shell_amount
n.AddModifier(mod)
In pymxs, modifiers are just runtime classes you call like constructors, and their parameters are plain attributes:
# New
mod = rt.Shell()
mod.outerAmount = shell_amount
rt.addModifier(n, mod)
The same pattern covers Edit_Mesh, maxOps.collapseNode, and centerPivot (it reads almost as the MAXScript).
What we added beyond parity
Since we are rewriting it anyway, why not make the tool better? Here are some quality of life improvements we baked in:
Undo as a single operation. Exploding a model creates a lot of nodes. Wrapping the whole run in a pymxs.undo block means a single Ctrl+Z reverts the entire explode instead of unwinding it one face at a time:
with pymxs.undo(True, “Explode Geometry”):
 ... # all node creation/deletion happens here
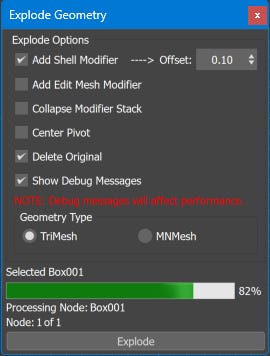
A real progress panel. Exploding a dense mesh can take a while, so the dialog now shows a progress bar plus the current node name and an N of M counter. This matches the .NET dialog with a progress bar. The conversion functions take an on_progress callback and pump QApplication.processEvents() so the UI stays responsive:
def _prog(cur, tot):
 self.progress_bar.setValue(int(cur * 100 / tot) if tot else 0)
 QtWidgets.QApplication.processEvents()
A debug toggle. Rather than littering the code with print calls, we route everything through Python’s logging module to the MAXScript Listener. A “Show Debug Messages” checkbox flips the logger between WARNING and DEBUG.
Note: Verbose logging affects performance, especially around hot paths and loops when there are many nodes/faces to explode. The completion summary is always printed regardless of the toggle.
Timing feedback. We wrap the run with time.perf_counter() and report how long the explode took — handy when you’re comparing the TriMesh and MNMesh paths on the same model.
pymxs.print_(”[ExplodeGeometry] Explode completed in {:.2f} seconds.\n”.format(elapsed)) Python 2 to Python 3, while we’re here
The classic sample was Python 2 (note the print msg statements and the Qt4-era PySide/QtGui imports). The port is clean Python 3 on PySide6: QtWidgets instead of QtGui, pymxs.print_() for Listener output, and modern signal connections like checkStateChanged.
Shipping it as an AppBundle
Running a script from the editor is fine for development, but the sample also ships as a proper Automatic Loader AppBundle under Bundle2/, so it can show up as a menu entry right next to the .NET version. The package’s Contents/python/ folder carries explode_geometry.py, and a small macroscript launches it:
macroScript ADNExplodeGeomPyMS
  category:"ADN Samples"
  tooltip:"Explode Geometry (Python)"
  buttonText:"Explode Geometry (Python)"
(
 local scriptDir = getFilenamePath (getSourceFileName())
 local pyFile = scriptDir + "..\python\explode_geometry.py"
 python.ExecuteFile pyFile
)
How do we run the AppBundle?
You have two ways to get 3ds Max to load the bundle:
Copy it into an auto-discovered plug-in folder. 3ds Max automatically scans the ApplicationPlugins directories on startup. Drop the Bundle2 folder (renamed to something like ADN-ExplodeGeometry.bundle) into one of:
%PROGRAMDATA%\Autodesk\ApplicationPlugins (all users), or
%APPDATA%\Autodesk\ApplicationPlugins (current user).
Point an environment variable at it. Set ADSK_APPLICATION_PLUGINS to the folder containing your bundle before launching Max — handy when you’re iterating and don’t want to copy files around.
#Set ENV var (check terminal specifics for PowerShell/CMD/etc)
set ADSK_APPLICATION_PLUGINS=D:/path/to/bundle/parent/dir

# Launch mamax in the same shell
3dsmax.exe
It’s not advisable to copy plugins to the default Max installation directories (<max>/Plugins, <max>/scripts, etc). Use the external plugins directory shown above for a cleaner way to add and remove plugins. All plugins shipped via the Autodesk AppStore are installed in the external plugin directories; rest assured, Max scans these directories at startup and will discover your plugins.
See the 3ds Max developer docs on the Plug-in Package (.bundle) format and PackageContents.xml for the full directory layout and the auto-loader search paths.
Once the bundle loads cleanly, you’ll find the tool on the main menu under App Store → Explode Geometry (Python), sitting alongside the original Explode Geometry (.NET) entry. Select your objects, launch it, and you'll see the same dialogue you’d see in the editor.
Not ethat the Python menu entry is part of the GitHub sample, but won’t show if you install the plugin from the AppStore.
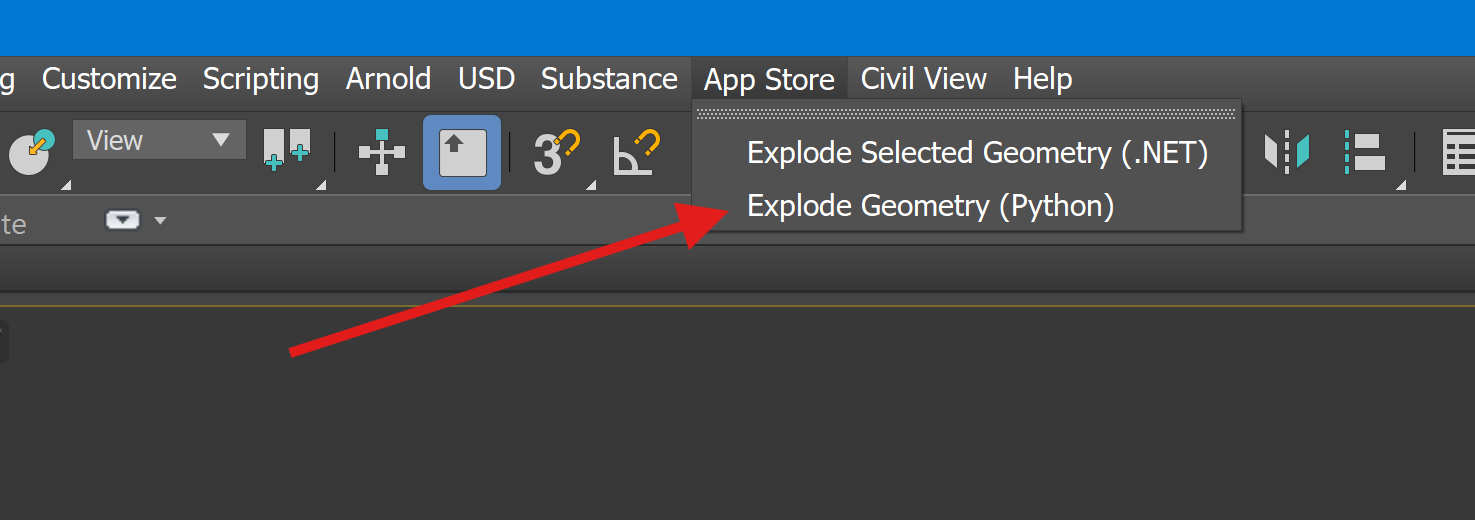
One nuance worth knowing: the Python menu entry is only registered on 3ds Max 2027 and up. The post-start-up menu script gates it on the Max version:
-- Only add the Python menu entry for 3ds Max 2027+ (maxVersion 29000),
-- where Python support in the menu system is available.
if (maxVersion())[1] >= 29000 then
(
 newSubMenu.CreateAction "85045470-A03C-45EC-A13F-538346AF077A" 647394 "ADNExplodeGeomPyMS`ADN Samples"
)
The .NET action is added on all supported versions; the Python one is for 2027+ only.
A note on Qt versions
The sample is written against PySide6 (Qt 6), which is what ships with 3ds Max 2026 and 2027 — so on those releases it runs as-is.
On 3ds Max 2022–2025, the bundled Qt is the PySide2 (Qt 5) generation, so the imports and a few API details won’t match out of the box. If you want to run it there, you’ll need to adjust things like:
from PySide6 import ... → from PySide2 import ...
Scoped enums back to flat ones — e.g. QtCore.Qt.WindowType.Tool → QtCore.Qt.Tool.
Signal differences — e.g. the Qt6 checkStateChanged signal versus Qt5’s stateChanged.
QDialog/QMessageBox.exec() versus the older exec_().
None of these is hard, but they’re version-specific. Consider it a good exercise in learning where PySide2 and PySide6 diverge and a reminder always to check which Qt your target Max ships before writing UI code.
Lessons learned
A few takeaways for anyone facing a similar MaxPlus migration:
pymxs is usually less code, not more. The instinct is to fear that dropping a “high-level” wrapper means more boilerplate. In practice, the opposite was true — rt.mesh(...) and polyop.detachFaces(..., asNode=True) replaced dozens of lines of manual construction.
Prefer Max’s own operations over rebuilding geometry. The biggest simplification came from detaching faces instead of reconstructing them. When the SDK already does the thing you want, use it.
Watch index invalidation. Anything that adds or removes faces/nodes mid-loop can shift the indices under you. Iterating in reverse is a cheap fix.
qtmax is your friend for UI hosting. GetQMaxMainWindow() plus a Tool window flag gives you a well-behaved dialog without MaxPlus’ dockable helpers.
Try it out
The ported sample lives in the Explode Geometry repository under Python/explode_geometry.py. There are two ways to run it:
Straight from the editor — open Python/explode_geometry.py in the 3ds Max scripting editor and execute it. Quickest for poking at the code.
As an AppBundle — load the Bundle2/ package as described above and launch it from App Store → Explode Geometry (Python) (2027+).
Either way: select an object (or several), pick TriMesh or MNMesh, choose your options, and hit Explode. Then enjoy a single Ctrl+Z to put it all back together. It runs as-is on 3ds Max 2026/2027; for 2022–2025 you’ll need the PySide2 tweaks noted above.
The original .NET plug-in was written by Kevin Vandecar, from an idea by Louis Marcoux. The first Python version was developed by Drew Avis. This pymxs port modernises that work for 3ds Max 2022 and beyond.